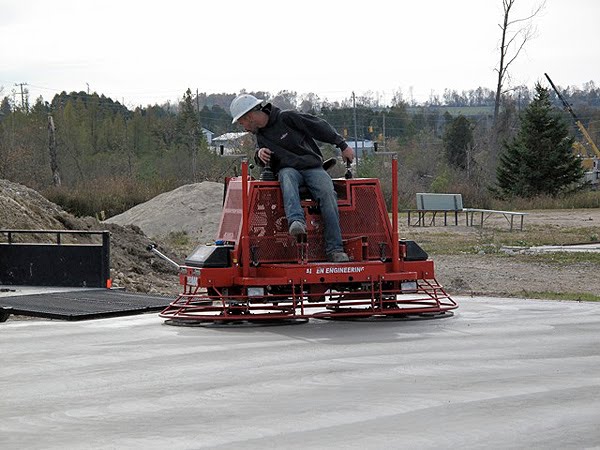
The beginning of the week brought good enough weather for the pouring of the concrete floor. It seems amazing to me that all the work of the previous week, the tubes, the mesh and the insulation, gets covered over with what now looks like a concrete skating rink.
I thought these polishing machines looked like bumper-cars at a fairground. I wonder if they are fun to drive?
The surface is beautifully smooth with just a few reminders of the work below, such as the plumbing piping and heat manifolds.
The end of the week was wet and rainy and the workers took a break. The roof trusses and lumber for the walls was delivered, but looked lonely against the grey sky. We cross our fingers that next week’s weather will be more cooperative.
Friday, October 23, 2009
Friday, October 16, 2009
Week 8: Hot, hot heat
The next step on the construction ladder was to lay the insulation and wire mesh for the new in-floor radiant heat system. This is one of the exciting changes we have been able to make to our workshop as a result of the whole tornado experience. One has limited options when heating a wood shop, due to concerns about dust, so radiant heat is the perfect solution. It is very energy efficient and will keep everything at a comfortable working temperature during our cold, snow-belt winters. Here are some images of the process.
Rigid foam insulation was laid onto the compacted soil surface of the new addition and directly onto the concrete of the old foundation. Next, a layer of thick wire mesh is added which will allow the piping to be anchored flat.
During this phase, the groundwork for the plumbing also needed to be completed before the final concrete floor was poured.
A portion of the old concrete foundation was removed to accommodate our new CNC router, which needs to have a special thickness of foundation underneath it to help limit any possible vibration. The construction crews cut out and lifted the section of concrete, insulated the hole, and then laid the heat piping so that it dipped down into the hole and out again.
The snaking grid of in-floor tubing is quite a sight over the entire surface of the foundation. Another check mark achieved on the construction to-do list!
Thursday, October 8, 2009
Week 7: Smooth as a baby’s bottom (part 1)…well, almost…
The next task was to lay insulation against the foundation walls and backfill the trenches.
Friday, October 2, 2009
Week 6: Shaking the foundations
It has only been 6 weeks and the rebuilding has started! We are thrilled with the progress we are making. Now, if only Mother Nature will cooperate - I think she owes us one, don’t you? Please keep your fingers crossed for a dry autumn.
The first job was to get the ground excavated for the new addition and to have the footings poured, as well as some minor touch-ups to the old foundation. The excavators that took down the remainder of the old building were a little over-zealous at times.
The week started off with rain on Monday (very disheartening), but luckily Tuesday cleared up enough to start the work on the footings. The trenches were dug and the concrete forms created.
I was not sure how long this whole process would take, but in only three days the forms were coming off and the new foundation footings were complete!
Saturday, September 26, 2009
Week 5: Getting ready to put shovels in the ground
Thomas and I had a pleasant surprise visiting the building site today (Saturday) when we found Frank Domm busy marking out the foundation in preparation of the start of construction next week. Walls were laid out and annotations about what was to stay and what was to be removed helped to make us feel like this building may actually start taking shape!
We were particularly pleased to see this next image, the markings for the machine pad for the most exciting new addition to our workshop - a new CNC router. More on this in the coming weeks!
Monday, September 21, 2009
Week 5: The building contract is signed!
Let the fun begin! I cannot believe it is only five weeks since the tornado struck and we are taking the plunge and signing on the dotted line. We have hired a local company, Domm Construction, which has been in business since 1985 and is well known in the area for their quality construction. Frank has agreed to make it part of the contract that we will be able to start accessing the building in December to move in and set up machinery, so we feel extremely relieved to have a target date in our sights. Construction will start next week, weather permitting!
Tuesday, September 15, 2009
Week 3-4: Plans for the new building
We are getting excited because plans are being finalized for the new workshop. We have decided to look on the bright side of this whole experience and take the opportunity to build a larger building. We are adding 1500 sq ft and will also get a chance to implement the many improvements that we have been planning in the past few years. Here are some of the working plans.
The outside of the building is utilitarian (it is a workshop, after all) with a nice array of windows to let in natural light. The walls and roof will be clad with dark grey Galvalume corrugated metal.
We decided to move the overhead loading door to the east side of the building for easier access. Although I must say, I was always impressed at how the various freight and supply company’s drivers were able to manouever their large tractor trailers back to our old loading door. You can also see the 2 man-doors (that’s builder-speak for a regular hinged door) that will allow access to the main workshop area and the new back addition.
This is a plan view of the main workshop floor. You can see the new rear section that will house a separate finishing room, assembly and pack/ship area. We are particularly excited about the new finishing room as this will really improve our efficiency and ensure an even higher quality product. We have also gained some valuable storage and work space in the northeast corner of the shop.
This is a plan view of our office. It is quite similar to the layout we had before with a large open plan space, a small kitchenette and bathroom, and an added window on the east wall to help with air circulation.
The outside of the building is utilitarian (it is a workshop, after all) with a nice array of windows to let in natural light. The walls and roof will be clad with dark grey Galvalume corrugated metal. We decided to move the overhead loading door to the east side of the building for easier access. Although I must say, I was always impressed at how the various freight and supply company’s drivers were able to manouever their large tractor trailers back to our old loading door. You can also see the 2 man-doors (that’s builder-speak for a regular hinged door) that will allow access to the main workshop area and the new back addition.
This is a plan view of the main workshop floor. You can see the new rear section that will house a separate finishing room, assembly and pack/ship area. We are particularly excited about the new finishing room as this will really improve our efficiency and ensure an even higher quality product. We have also gained some valuable storage and work space in the northeast corner of the shop.
This is a plan view of our office. It is quite similar to the layout we had before with a large open plan space, a small kitchenette and bathroom, and an added window on the east wall to help with air circulation.
Subscribe to:
Posts (Atom)